
First Steps to Serverless on AWS: A How-To Guide
A step-by-step tutorial on how to build and deploy a simple serverless web application on AWSIn a previous article, we talked about what serverless applications are and how they work. In this article, we will build and deploy a simple serverless web application on AWS (AWS is the cloud computing platform created by Amazon). For this application, I will assume that you have an AWS account already set up (if not, start here). While AWS has an enormous number of tools available for developers, we will focus on two: Lambda and API Gateway.
Lambda is the general serverless function-invocation system on AWS. Essentially, everything that happens in AWS, whether it is a file upload, a video transcoding job, or an HTTP request, can be enabled to trigger a function defined in Lambda for further processing. Lambda functions essentially exist as a virtual machine that waits around for AWS to call the defined function within it. Depending on the load, Amazon may keep one, one thousand, or even zero copies of your function hanging around. If the load is high enough that it needs more copies of your function executing simultaneously, it will boot up more instances of the virtual machine that holds your function.
The other technology we are using is AWS’s API Gateway. The API Gateway allows you to define a set of HTTP endpoints (i.e., URL paths) that get routed to different parts of AWS. For instance, let’s imagine that you had two separate web applications that were running, but you wanted to put them both behind the same domain name, just in different paths. You could create an API gateway that would route all traffic that includes the path /app1 to the first application, and all traffic that includes the path /app2 to the second application. However, more pertinent for our purposes, you can also route a path to a Lambda function. So, what we will be doing is:
- Creating a Lambda (to perform our function)
- Creating an API Gateway (to receive HTTP requests)
- Creating a route on the API Gateway (to invoke our Lambda function)
The Lambda Function
Let’s begin by creating the Lambda function. When you are logged in to the AWS console, you can find the Lambda section by clicking on “Services” in the upper-left corner, choosing “Compute,” and then selecting “Lambda.” On the left will be a menu item called “Functions.” Clicking that will give you the screen below:
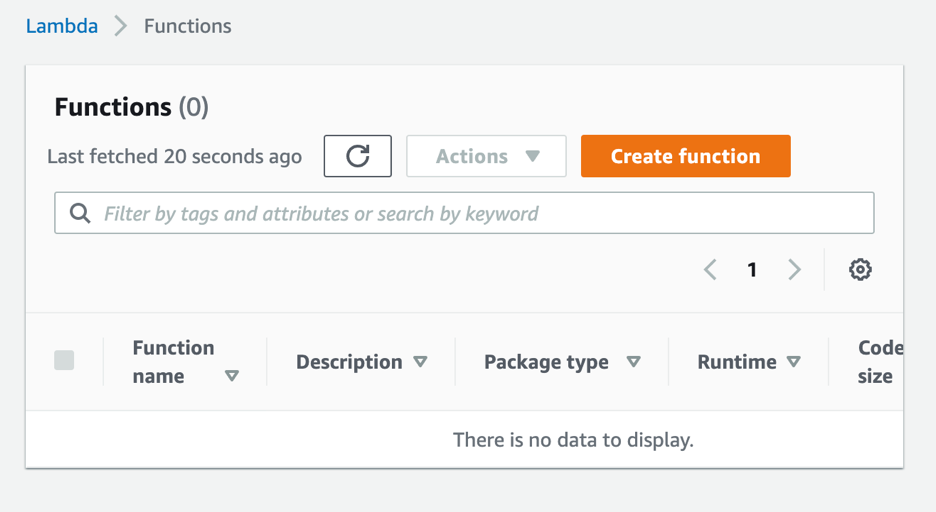
Click on the “Create Function” button to create your first function.
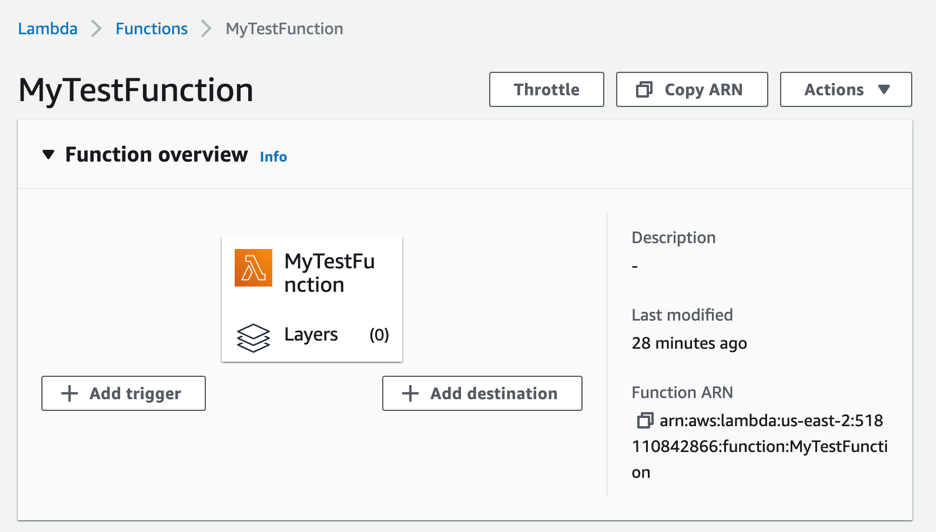
In the next screen, you want to choose “Author from Scratch.” Then give your function the name MyTestFunction, and be sure the Node.js runtime is selected. You can leave the remaining defaults as they are. Now click “Create Function” at the bottom of the screen. This will create a basic default function, put in sample code for it, and assign it an ARN. ARNs are AWS’s way of uniquely identifying resources within AWS. The ARN for your function will be something like “arn:aws:lambda:us-east-2:ACCOUNTNUMBER:function:MyTestFunction.”
The code that AWS auto-generates is built for functions that work for API Gateways. The default code looks like the following:
exports.handler = async (event) => {
    // TODO implement
    const response = {
        statusCode: 200,
        body: JSON.stringify('Hello from Lambda!'),
    };
    return response;
};
What this code does is define a program that has a function called “handler” (which is a special name for the Lambda function handler) which takes an incoming AWS event (i.e., a function invocation) and returns the result. The contents of the “event” variable, and the contents of the “response” returned will vary depending on what your Lambda function is used for. In this case, we are using the API Gateway, so the event will be an API Gateway Proxy Request and the response will be an API Gateway Proxy Response. These structures are defined here (look under the section “Event Format”).
We are going to modify the code slightly to show some additional features.
exports.handler = async (event) => {
    console.log("Hello Log!");
    console.log(event);

    var response = {
        statusCode: 200,
        body: JSON.stringify('Hello from Lambda!'),
    };

    if(event.queryStringParameters != null) {
        var name = event.queryStringParameters["name"];
        if(name != null) {
            response.body = JSON.stringify("Hello " + name);
        }
    }

    return response;
};
This new code will add some logging so you can see what the invocation looks like in the log. Additionally, it will look for a query string parameter called “name” and use that to greet you.
Once the code is in, click on the “Deploy” button to make that the live version of the code.
Integrating with an API Gateway
Now that the function is “live,” we need to create a way to invoke it. In the “Function overview” section, click the button that says “Add trigger.”
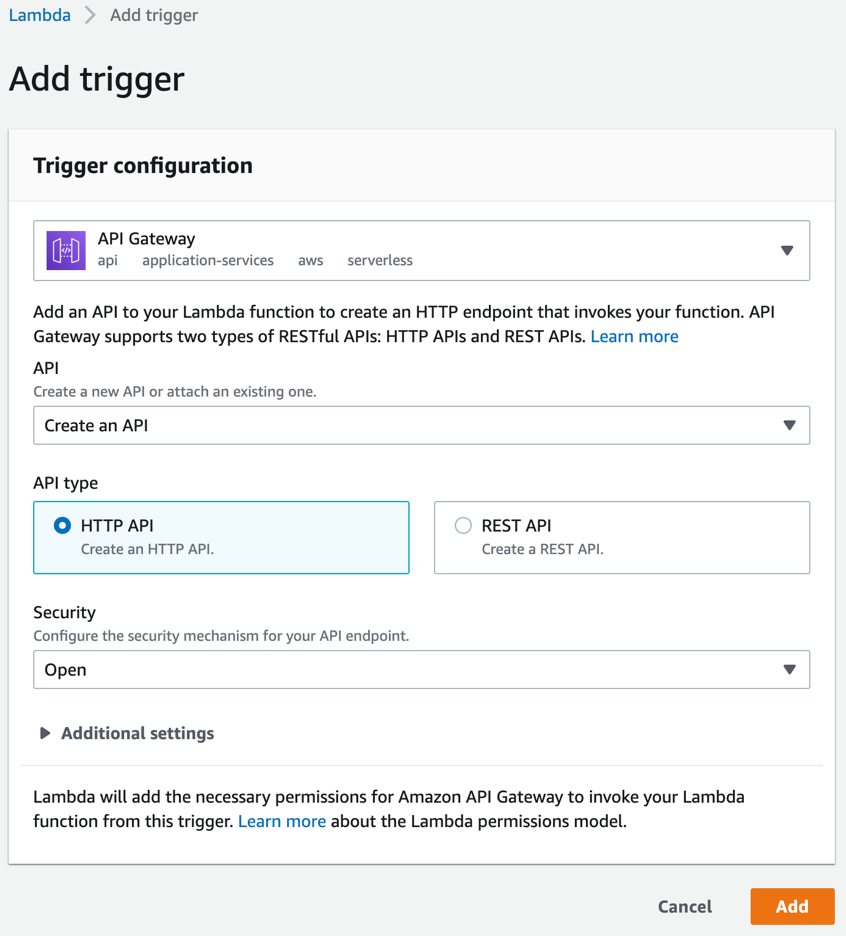
This will bring up a list of possible things that could trigger this lambda. Choose “API Gateway.” If you don’t have any API Gateways defined (you probably don’t), it will have “Create an API” auto-selected.
If you do, it will give you a choice of API Gateways to use for this. For this exercise, be sure “Create an API” is selected. For “API Type,” it doesn’t matter for this exercise, but you can just choose “HTTP API” (see here for a list of distinctions). Under “Security” choose “Open.” Then click “Add.”
This will then take you back to the Lambda screen, but you will be under the “Configuration” tab. This has information on the triggers that trigger this function. In the list of “Triggers,” it should have a link that says, “API endpoint.” Clicking that link will bring up the greeting you programmed the lambda to make! To have it greet you personally, add “?name=YOURNAME” to the end of the URL.
To create more functions in the API Gateway, just add the functions to lambda, add an event trigger, and choose the API Gateway you just created.
You can also modify the API Gateway by going to “Services,” then “Networking & Content Delivery,” and choosing “API Gateway.” If you didn’t like the default route it added for your function, you can add a new route to your function using this interface. However, note that there are a LOT of configuration options and considerations for API Gateways that are outside the scope of this tutorial.
Checking Logs
Finally, we should also check the logs for our application, as this is the primary means of debugging Lambda functions. Since you can’t actually log in to the machine running your lambda function, looking at the logs is the only real way to see what is going on.
To see the logs for your lambda, click on the “Monitor” tab of the Lambda screen. Then click the “View logs in CloudWatch” button. This will give you a list of “Log streams.” The topmost one should be the “current” log stream (though there may be multiple active if AWS booted up multiple copies of your Lambda).
Each Lambda invocation starts with a line that says “START RequestId: ID-FOR-REQUEST.” Then, it has a list of all of the output for that invocation. In our case, it should say, “Hello Log!” on one line, and a listing of all of the event parameters in the second line. The “END” line marks the end of the run, and the “REPORT” line gives running statistics. The important ones are “Billed Duration,” “Memory Size,” and “Max Memory Used.”
Billing
Lambdas are charged based on the number of milliseconds run, depending on the location and machine size. As of right now, in “us-east-2” (the location I’m using), the charge is $0.0000166667 for every “gigabyte-second.” Note that this is based on the “Memory Size” in the report above, not the “Max Memory Used.”
Converted to milliseconds for our 128 MB machine (the default memory size), this comes out to $0.0000000021 per millisecond. In my case, the “billed duration” was 43 milliseconds, so a single invocation cost $0.0000000903. That means that I can run about 110,741 requests for a single penny. Additionally, for every million requests, AWS charges an additional twenty cents.
Note that you can use “Max Memory Used” to know if you can save money by lowering the amount of memory allocated to your process, and thus decrease your price per millisecond. You can set that in the “Configuration” tab of your lambda under the “General configuration” subtab on the left.
The API Gateway also comes with costs, however, which is $1 per million requests.
In all, AWS charges you for every aspect of the service it offers, but each individual piece occurs at a very low price. Once you add in disk usage, databases, etc., the costs get more difficult to calculate. Nonetheless, when using serverless infrastructure, AWS only charges you for what you actually use. There is essentially no charge for things “waiting to be used,” as you might get with a traditional hosting or cloud system.
Additionally, this approach can scale up to almost any workload imaginable, though they have initial quotas installed to keep you from accidentally doing something aggressively stupid. The default API Gateway quota allows for 500 new connections per second, and the default Lambda quota allows for 1,000 instances of each function to be active simultaneously. In terms of typical usage of a multinational corporation in a fairly standard integration, for most Lambda functions it is actually surprising to get more than ten active instances running at the same time.
Although AWS is only one of the serverless platforms available, it is probably the most popular. Hopefully this tutorial gives you enough of a start to experiment with AWS’s serverless features for yourself!